In the rapidly evolving software landscape, every second counts.
Whether you're pushing code to production or testing new features, the smoother your workflow, the better your product.
That's where Azure Pipelines comes into play.
If you're wondering how to create a pipeline in Azure, how a CI/CD pipeline works in Azure, or looking for a solid Azure Pipeline tutorial, you're in the right place.
Azure Pipelines is an essential part of DevOps pipelines, helping you automate builds, tests, and deployments with ease.
Whether you're managing a small app or an enterprise-scale system, creating pipelines using YAML pipeline Azure or classic editor can boost your speed and reduce errors.
In this blog, we’ll walk you through the features, benefits, and the complete process of building and deploying using Azure DevOps CI/CD.
By the end, you'll not only understand how Azure DevOps pipeline works, but you'll also know exactly how to set up a solid CI/CD workflow from scratch.
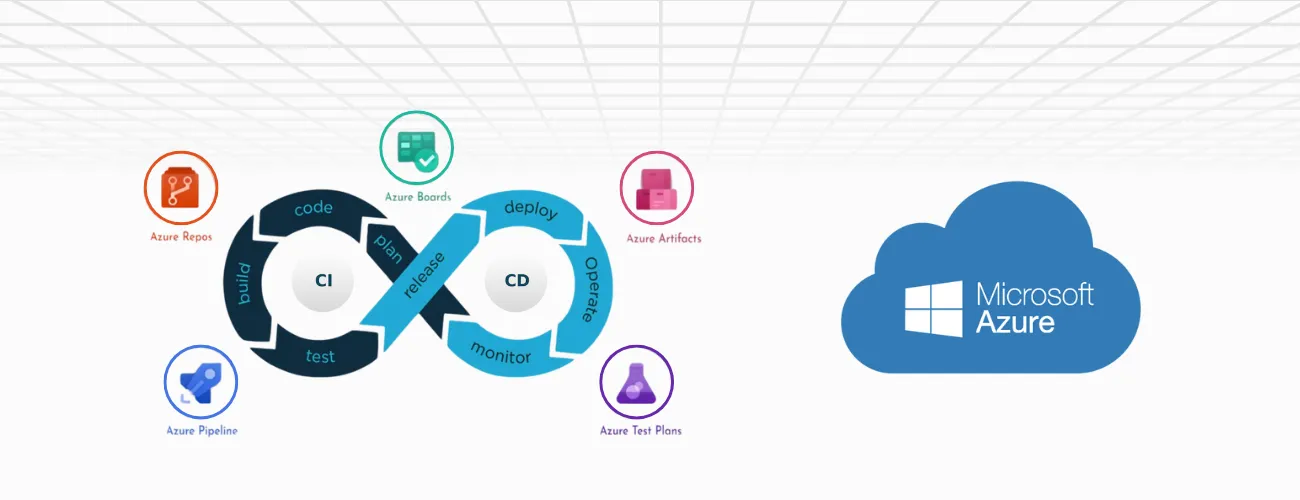
Azure Pipelines is a cloud-based continuous integration and continuous delivery (CI/CD) service offered by Microsoft as part of Azure DevOps.
It automates your development workflow by allowing you to build, test, and deploy with Azure Pipelines on any platform or cloud.
From compiling code and running tests to deploying across multiple environments, Azure Pipelines handles it all.
It supports a wide variety of languages, including Node.js, Python, .NET, Java, Go, and more.
No matter where your code lives--GitHub, Azure Repos, Bitbucket--you can plug into Azure Pipelines and streamline your DevOps pipeline.
In short, it’s your one-stop solution for fast, secure, and scalable deployments.
Azure Pipelines also integrates with container services, Kubernetes, and virtual machines, giving developers a lot of flexibility in how applications are delivered.
It is a fully managed service, so you don’t have to worry about infrastructure overhead.
Everything from the infrastructure to the runtime environments is taken care of by Azure, making the entire pipeline maintenance-free from a DevOps perspective.
You can choose between Microsoft-hosted agents or self-hosted agents depending on your build environment needs.
Microsoft-hosted agents provide convenience and quick setup, while self-hosted agents give you more control and can be used with specialized environments.
Another powerful feature of Azure Pipelines is its ability to create parallel jobs and deploy to multiple targets at once. This makes it an efficient choice when working with microservices or multi-platform projects.
It’s also tightly integrated with other Azure services, like Azure App Services, Azure Kubernetes Service (AKS), Azure Key Vault, and more, making deployment pipelines extremely powerful and customizable.
In essence, Azure Pipelines doesn't just automate your deployment process -- it helps you enforce best practices, speed up delivery cycles, and integrate testing right into your workflow. As your business scales, Azure Pipelines ensures that your deployments remain fast, safe, and error-free.
Additionally, Azure Pipelines is designed with modern DevOps teams in mind. That means real-time logs, built-in analytics, customizable dashboards, and alerting features that make monitoring your deployments intuitive and proactive.
You can also use environment-specific variables, stage-specific deployment conditions, and rollback options to further refine your pipeline’s reliability.
Azure Pipelines brings transparency and control into the DevOps lifecycle. Teams can see exactly what's happening, when and where code is moving, and whether it's healthy. By visualizing the process and enforcing checks, it's easier to build confidence in every release.
For developers and stakeholders alike, this kind of visibility is essential. Everyone can stay informed without having to dig through logs or ask around for updates.
When it comes to CI/CD, both Azure Pipelines and GitHub Actions offer powerful automation tools.
Choosing between them depends on your project's ecosystem, complexity, and team needs.
Whether you're building enterprise apps or small projects, understanding the differences between these tools can help streamline your DevOps pipeline and improve efficiency in your CI/CD workflow.
Feature | Azure Pipelines | GitHub Actions |
Platform Integration | Deep integration with the Azure DevOps ecosystem | Native integration with GitHub repositories |
YAML Support | Yes, supports complex YAML pipelines | Yes, with flexible and simple workflow syntax |
Hosting Options | Microsoft-hosted & self-hosted agents | GitHub-hosted & self-hosted runners |
Secret Management | Azure Key Vault & variable groups | GitHub Secrets |
Marketplace Extensions | Azure DevOps Marketplace | GitHub Actions Marketplace |
Build Matrix Support | Advanced matrix and strategy support | Built-in matrix strategy support |
Permissions & Access | Fine-grained controls via Azure DevOps | Repository-based permission model |
Best Use Case | Enterprise-level apps with complex pipelines | Lightweight, GitHub-native projects |
Ready to build your first DevOps pipeline in Azure? Let’s get hands-on with a simple Java project example. Here’s how to go from zero to a working CI/CD pipeline in just a few steps:
Let me know if you'd like to use a different language sample or want to customize the pipeline!

So, you're diving into the world of Azure Pipelines? Whether you're new to DevOps or knee-deep in automation, understanding what makes up a DevOps pipeline is key to building, testing, and deploying your apps like a pro.
Let’s break it down with 7 essentials you’ll run into when setting up your build pipeline in Azure- no jargon overload, we promise.
Every pipeline in DevOps is made of tasks--these are the commands your pipeline runs. Imagine your pipeline is a to-do list for your code: compile it, run tests, deploy it, clean up files, and so on.
From simple builds to complex deployments, tasks make it all happen. You can use built-in tasks, find cool ones from the community, or create your own custom magic.
Templates are reusable chunks of YAML code. If you’re creating multiple DevOps pipelines, you don’t want to rewrite the same logic repeatedly, right? Templates let you define it once and plug it in wherever needed, keeping your code clean and maintainable.
They're great for teams that want to keep their CI/CD in Azure DevOps standardized across projects.
Hardcoding values in your YAML is so last year. Instead, use parameters to pass different values at runtime--like choosing between a staging or production environment when you trigger a build.
This makes your Azure DevOps pipeline more flexible and powerful.
Now you can reuse the same pipeline in Azure across environments without editing the core file.
Variables are like placeholders that your pipeline can reference across tasks. They’re great for things like version numbers, file paths, or flags that toggle features.
Azure also gives you system variables out of the box. Plus, you can keep secrets like API keys hidden using secret variables. All of this helps in creating pipelines that are secure, consistent, and easy to update.
Speaking of secrets, you don’t want sensitive info like database passwords showing up in plain text in your logs. Enter secret variables--they’re encrypted, hidden, and safe.
You can store them in Azure DevOps itself, or connect your pipeline to Azure Key Vault for enterprise-grade protection. It’s a best practice in any DevOps pipeline example to isolate credentials and tokens using secret management.
Why run a build manually when you can have it kick off automatically? With CI/CD in Azure DevOps, you can set triggers to run your pipeline when certain events happen--like pushing code to a specific branch or creating a pull request.
Want nightly builds or weekly deployments? Scheduled triggers have you covered. Need a build pipeline. Can Azure start on the completion of another pipeline? Pipeline triggers have got your back.
Last but not least: agents. These are the servers (real or virtual) that execute your pipeline steps. Azure offers Microsoft-hosted agents with common tools pre-installed – ideal for quick setup. But if you need something more custom, go for self-hosted agents.
Whether you’re deploying to Azure App Service, Kubernetes, or something more exotic, agents are the workers doing the heavy lifting.
When working with Azure Pipelines, you have two primary methods to set up and manage your workflows: using YAML syntax for a code-first approach or leveraging the classic user interface for a visual, step-by-step setup.
The YAML-based method lets you define your entire pipeline process as code in a file typically named azure-pipelines.yaml.
This file lives right alongside your application code in your version control system, making your pipeline fully traceable and versioned.
Here’s how it works:
To get started with YAML pipelines:
This approach is great for teams practicing Infrastructure as Code or looking to keep configuration consistent and transparent.
For teams that prefer a more visual setup, the Classic Editor in Azure DevOps offers a user-friendly way to configure pipelines without writing YAML.
This drag-and-drop style interface allows you to define two major components:
Here’s the general process:
This method is ideal for those who prefer a point-and-click setup or want to avoid managing pipelines through code.

When it comes to real-world implementation, partnering with a top-tier Azure development company like DotStark can make a huge difference.
DotStark is an expert Azure development company known for delivering tailored DevOps solutions using Azure Pipelines.
They help teams implement automated CI/CD workflows that are scalable, reliable, and efficient.
By using best practices in build pipeline, Azure strategies, and smart deployment methods, DotStark ensures faster releases and fewer production issues.
Their experience in setting up secure, end-to-end pipelines allows you to focus more on development and innovation rather than worrying about infrastructure or manual deployments.
DotStark brings the technical expertise and strategic insight you need to succeed.
Azure Pipelines is a powerful tool that simplifies and automates the CI/CD process, helping teams build, test, and deploy applications faster and with fewer errors.
Whether you’re working with YAML or the Classic UI, Azure Pipelines offers flexibility, scalability, and deep integration with modern development tools.
By embracing automation, you reduce manual work, speed up delivery, and improve software quality. Whether you're a solo developer or part of a large DevOps team, mastering Azure Pipelines can significantly enhance your development workflow. Ready to streamline your deployments? Azure Pipelines is the smart way to build and deliver with confidence.
To get started, connect your code repository (like GitHub or Azure Repos) to Azure DevOps. You can then choose between the Classic UI or create a YAML file to define your build and deployment steps. Once committed, Azure Pipelines takes over and automates the process.
YAML pipelines are defined as code, live in your repository, and are version-controlled. They’re ideal for teams following DevOps and Infrastructure-as-Code practices. Classic pipelines use a graphical interface and are easier for beginners or teams preferring a no-code setup.
Absolutely. Azure Pipelines supports multi-stage deployments, allowing you to build once and deploy to environments like dev, staging, and production using stage-specific variables and conditions. You can even integrate approvals and gates for safe releases.
Yes, Azure Pipelines offers free usage for public projects and small private projects. For larger teams or private repositories, there are paid plans that include more parallel jobs and higher limits for build minutes.
You can use Azure Pipelines for almost any project type– web apps, microservices, mobile apps, APIs, containers, and more. It supports .NET, Java, Node.js, Python, PHP, Ruby, Go, and even mobile development stacks like Xamarin or React Native.

Nitesh Raiwar is a skilled .NET Developer with a strong proficiency in Kentico, AWS, React, and Strapi CMS, currently contributing to DotStark Technologies. With over 4 years of specialized experience in Kentico, AWS, React, Strapi CMS and a solid foundation in software engineering, Nitesh demonstrates exceptional capability in developing efficient and robust applications.
Follow on LinkedIn